
Halloween went well again. This time the costumes were slightly more elaborate, but I think that trend is going to have to reverse next year - both the idea bucket and the wallet have drained dry.
This year Gwen was a fairy princess wearing cowgirl boots:

She also has a Wonder Woman crown on for some reason. I wanted her to wear the crown I spent so much time on last year, but she says it's too small and uncomfortable, so oh well.

I decided that I needed to make myself extremely uncomfortable all day and wore my costume to work:

Yes, I do have an office to myself. I have no idea why. The cable you see handing over my door caught on fire on my desk thanks to a faulty power supply. It's a trophy of war. Software engineers don't get too many of those in comparison to the electrical engineers, so I display it proudly.
The armor really is steel and weighs way too much for my out-of-shape frame. But sacrifices must be made in the name of fashion! It was custom-made for me in the Ukraine and shipped here. The beard came from Amazon.com. The sword and hammer are both made in Spain by two different guys. They're meant for live-action role playing, so they're safe but very durable. Most of the time I was at work I was having people hit me as hard as they could in the chest with the hammer. They tell me it felt very satisfying. I'm not sure if it was the hitting someone that was gratifying, or that hitting me was gratifying. I decided it was best not to ask.
A few more:


I ran out of money, so the costume is incomplete. I have no boots nor any kind of arming gambison, so I had to make do with normal shoes, black jeans, a long-sleeved t-shirt, and a padded up towel under my shoulders. The lantern has a candle-flicker LED in it - originally it had a plain white LED with clear glass and a bad paint job, but Gwen's aunt Emily frosted the glass and gave it a new splash of paint after I had replaced the LED.

Trunk or treat at Gwen's elementary school. My trunk has a habit of closing on people's heads, so I propped it open with some swords. The shrunken goblin heads are the favorite part of my costume I think.
I've gotten several requests for how I made the wings, so here's a probably all-too-detailed description. Start off with the shopping list:
- Fairy wings
- Electroluminescent (EL) wire
- EL wire inverter (power supply)
- Battery pack
- Small project box
- Toggle switch
- Lightweight fishing line
First step, obtain a set of fairy wings in some fashion. How you do so is up to you. I am not a crafty person and have no advice on how to build them.
Second, obtain some EL wire. For the wings I used one of these red and aqua strips. This stuff isn't exactly the simplest to work with, but the end result is worth it.
Get a basic idea of how much wire you're going to need. Lay out the wire alongside the edges of the wings and hold it in place with clothespins. Start with the wire connectors in an inconspicuous spot near the center of the wings.

Next, starting with the wire connectors, stitch the EL wire to the wing frame using lightweight fishing line. You should be able to get away with a stitch every inch or so on the parts of the wings where the frame isn't curving much, but you'll need to make more around tight curves. Do your best to keep the EL wire along the edge of the wings so it can be seen from the front and the back.

This is an example of what happens when you're not careful enough:

I ended up having extra wire once I'd made it all the way around both the large and small wings on each side, so I had two options:
- Cut the wire and be left with short pieces that I may never have a use for, or
- Loop the remaining wire to the other wing
I went with option #2 because I hate wasting things. It doesn't hurt that it ended up looking pretty nice too.

EL wire needs to be driven by high-frequency AC voltage to illuminate. To drive these strips, I used this inverter. I could probably have gone with a smaller (lower voltage) one, but the other ones I had were just a bit too underpowered to drive the wings brightly enough. What's a little overkill, right? Note that the inverters emit a high-pitched whine as they operate, but it's not noticeable in any amount of ambient noise.
Here's the completed power pack, before getting to how it was built:

It's not very robust. Given her prior history, I'm not expecting Gwen to want to use the wings again so I didn't spend a bunch of time making sure the batteries didn't fall out or the wires didn't get yanked apart.

The project box is one I had laying around for years. It originally came from Radio Shack, but just about anything would have worked fine. The switch is one I had laying around as well, and I bought the batter holder at the same time as the EL inverter from Adafruit. I drilled a hole for the switch and used my Dremel to make some notches for the wires to come out of the box Soldering the battery lines to the switch and inverter is the simple part (says the engineer).
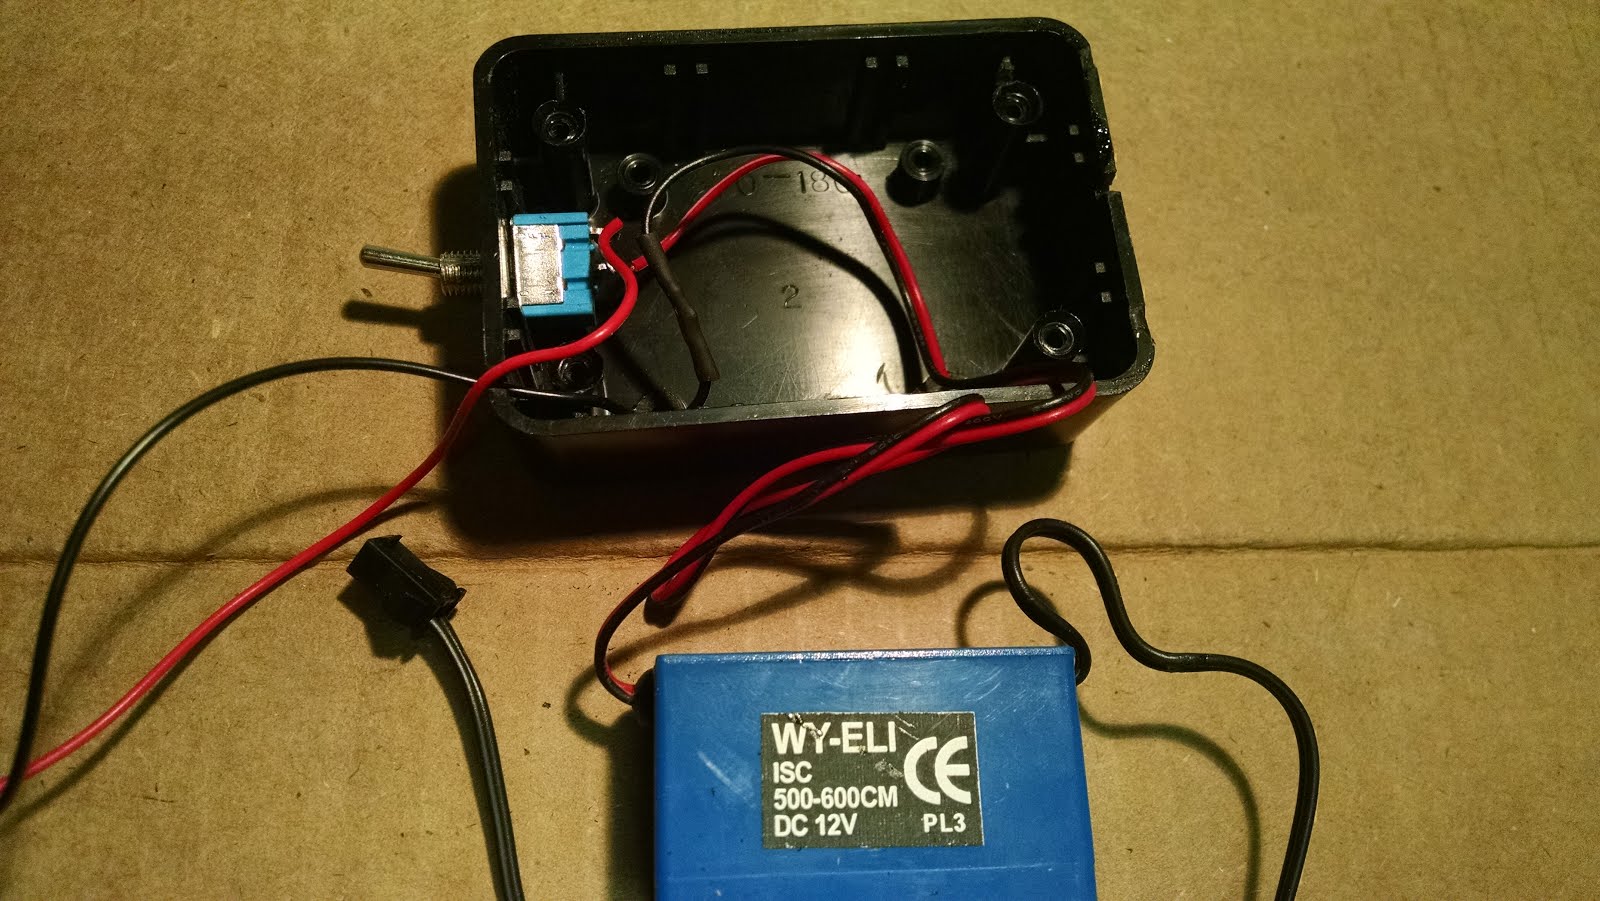
"But there's only one wire coming from the inverter and there are two cables on the wings!" I hear you say. No fear, we have two options. First, we could solder the two EL wires together. This is unpleasant - you can solder the stuff, but it's a bit nasty. Instead, I bought a splitter and extension cable to connect everything up.


I had hoped to make a little purse or something to put the electronics into that I could put on her belt, but alas I ran out of time. Gwen just toted them around in her candy bag instead.
I also made her an EL wand before the wings as a warm-up exercise. It turned out OK, but it could certainly have been better. I ended up zippy-tying the inverter to the handle. It made the grip more uncomfortable, but I couldn't convince it to stay put any other way.

For it, I used a smaller inverter that only takes 1 AAA battery, but it does have a blink option! It's not strong enough to drive an entire strip, so I had to cut it down and top off the end with shrink wrap. I also had to use a lot more stitches on the wand since the curves are much tighter.

I have more pictures if anyone is interested, just ask.